> ## Documentation Index
> Fetch the complete documentation index at: https://support.getproximate.app/llms.txt
> Use this file to discover all available pages before exploring further.
# Advanced Integrations: Hook Any Tool into Proximate
> Advanced Integrations let scripts, CLI tools, and AI agents trigger Proximate cursor notifications using a simple URL-based hook command.
Advanced Integrations close the gap for tools that don't have an app to monitor. Command-line utilities, build scripts, and AI coding agents running in a terminal all finish their work silently — you either watch the terminal or you miss it. With Advanced Integrations, any tool that can open a URL can light up an icon right next to your cursor the moment it's done, so you can stay focused on something else and come back only when you're actually needed.
Create your first custom hook in Proximate in under five minutes.
Wire Proximate into Claude Code CLI so an icon appears whenever Claude finishes a task.
## Who This Is For
Advanced Integrations are designed for developers and anyone comfortable working in a terminal. If you can add a line to a config file or drop a command into a shell script, you have everything you need to get started.
## How It Works
Every Advanced Integration you create gets a set of hook commands built around the `proximate://` URL scheme. When your tool runs one of those commands, Proximate picks it up and displays the icon you configured right next to your mouse pointer — the same way it surfaces notifications from native macOS and Windows apps.
Because the hook is just a URL, anything that can open a link can trigger it: shell scripts, Makefiles, CI runners, AI agent hooks, or a single line in a terminal.
## The Four Hook Types
Each integration comes with four ready-to-use hook commands. You can use whichever ones make sense for your workflow — you don't have to use all of them.
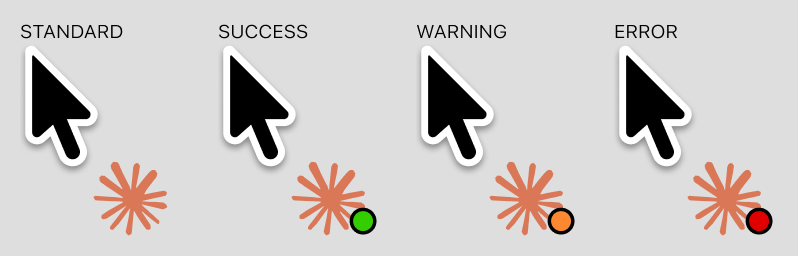 | Hook | Badge | When to use |
| ------------ | ----------------------- | ------------------------------------------------------------- |
| **Standard** | No dot | A general-purpose signal that doesn't carry pass/fail meaning |
| **Success** | Green dot (lower-right) | The task completed successfully |
| **Warning** | Yellow/orange dot | The task finished but something needs your attention |
| **Error** | Red dot | The task failed or encountered an error |
The Standard hook is the most flexible — use it when you just need a "done" signal. If you only care about failures, wire up just the Error hook and ignore the rest.
## Keeping Your Hook ID Private
Each hook command contains a unique private ID that identifies your integration. Proximate uses this ID to route the signal back to the right notification icon.
Treat your hook ID like a password. Don't commit hook commands to a public repository or share them publicly. If an ID is ever exposed, open your integration in Proximate and click **Rotate key** — your hooks will be regenerated with new IDs, and the old ones will stop working immediately. You'll need to update any scripts that used the old commands.
The risk of exposure is limited by design: a hook command can only display an icon next to your cursor. It cannot read your data, access your files, or execute arbitrary code. Proximate also ignores signals from any ID it doesn't recognize and enforces a rate limit of **10 signals per minute** per integration, so a leaked ID can't be used to spam your screen.
## Next Steps
Head to the [Setup guide](/advanced-integrations/setup) to create your first integration, grab a copy-paste recipe for your tool ([macOS](/advanced-integrations/recipes-macos) · [Windows](/advanced-integrations/recipes-windows)), or jump straight to the [Claude Code example](/advanced-integrations/claude-code-example) to see a complete end-to-end wiring.
| Hook | Badge | When to use |
| ------------ | ----------------------- | ------------------------------------------------------------- |
| **Standard** | No dot | A general-purpose signal that doesn't carry pass/fail meaning |
| **Success** | Green dot (lower-right) | The task completed successfully |
| **Warning** | Yellow/orange dot | The task finished but something needs your attention |
| **Error** | Red dot | The task failed or encountered an error |
The Standard hook is the most flexible — use it when you just need a "done" signal. If you only care about failures, wire up just the Error hook and ignore the rest.
## Keeping Your Hook ID Private
Each hook command contains a unique private ID that identifies your integration. Proximate uses this ID to route the signal back to the right notification icon.
Treat your hook ID like a password. Don't commit hook commands to a public repository or share them publicly. If an ID is ever exposed, open your integration in Proximate and click **Rotate key** — your hooks will be regenerated with new IDs, and the old ones will stop working immediately. You'll need to update any scripts that used the old commands.
The risk of exposure is limited by design: a hook command can only display an icon next to your cursor. It cannot read your data, access your files, or execute arbitrary code. Proximate also ignores signals from any ID it doesn't recognize and enforces a rate limit of **10 signals per minute** per integration, so a leaked ID can't be used to spam your screen.
## Next Steps
Head to the [Setup guide](/advanced-integrations/setup) to create your first integration, grab a copy-paste recipe for your tool ([macOS](/advanced-integrations/recipes-macos) · [Windows](/advanced-integrations/recipes-windows)), or jump straight to the [Claude Code example](/advanced-integrations/claude-code-example) to see a complete end-to-end wiring.